How To Install a Flagpole
A step-by-step guide to installing a commercial in-ground flagpole.
Installing a commercial flagpole takes planning and care, but it's a project a small crew can manage with the right preparation. This guide walks you through everything — choosing a location, pouring the foundation, assembling the hardware, and standing the pole.
Tip Before Installation: Choosing the Right Location
Before diving into the installation of your flagpole, it's crucial to select an optimal location. Here are some key considerations to ensure you get the most out of your flagpole:
1. Visibility
- Primary Goals: Choose a spot where the flagpole will be clearly visible from desired locations such as the road, entrance, or a building. The goal is to ensure that the flag can be seen and appreciated by those passing by or approaching the property.
- Aesthetic Impact: Consider how the flagpole will enhance the visual appeal of your property or business. The location should align with your overall aesthetic goals and draw attention as intended.
2. Space for Flag Movement
- Clearance: Ensure there is ample space around the flagpole for the flag to fly freely. The flag should not come into contact with buildings, trees, utility lines, or other obstructions that could cause wear or damage.
- Flight Path: Measure the length of the longest flag you plan to display and add a few extra feet for clearance. This ensures that the flag has enough room to move in the wind without interference.
3. Local Ordinances and Permits
- Regulations: Check with local authorities for any restrictions on flagpole height, location, or installation. Adhering to these regulations will help avoid potential issues and ensure compliance with community standards.
- Permits: Determine if any permits are required for flagpole installation. Securing necessary permits in advance will streamline the installation process and prevent delays.
4. Practical Considerations
- Accessibility: Choose a location that allows for easy access during installation and maintenance. Consider how you will handle tasks such as raising and lowering the flag, as well as any future repairs or adjustments.
- Safety: Ensure the installation site is free from hazards and provides a stable base for the flagpole. Avoid areas prone to flooding or erosion that could affect the stability of the foundation.
5. Assistance and Advice
- Consultation: If you're unsure about the best location for your flagpole or have any questions about the installation process, don't hesitate to seek advice. We are here to help and can provide guidance based on your specific needs and goals.
By carefully considering these factors, you can choose a location that enhances the visibility and impact of your flagpole while ensuring it is functional and compliant with local regulations. If you need assistance or have any questions about selecting the right spot for your flagpole, feel free to reach out for expert advice.
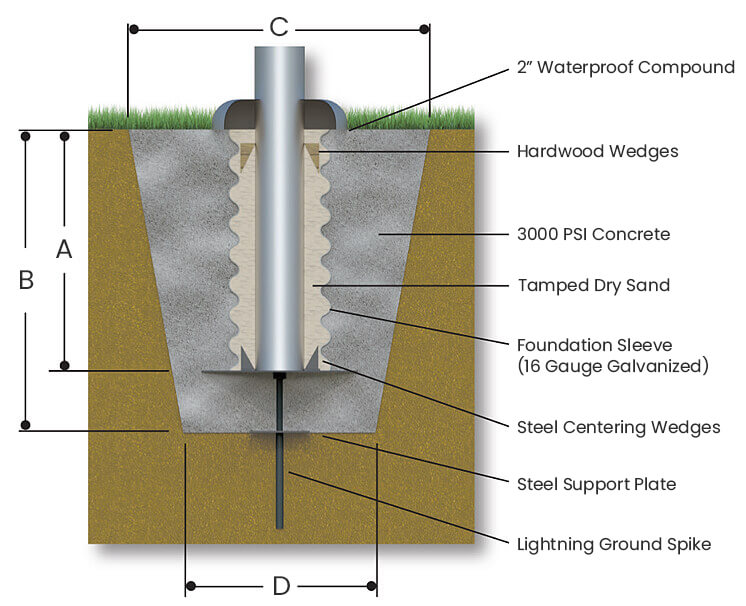
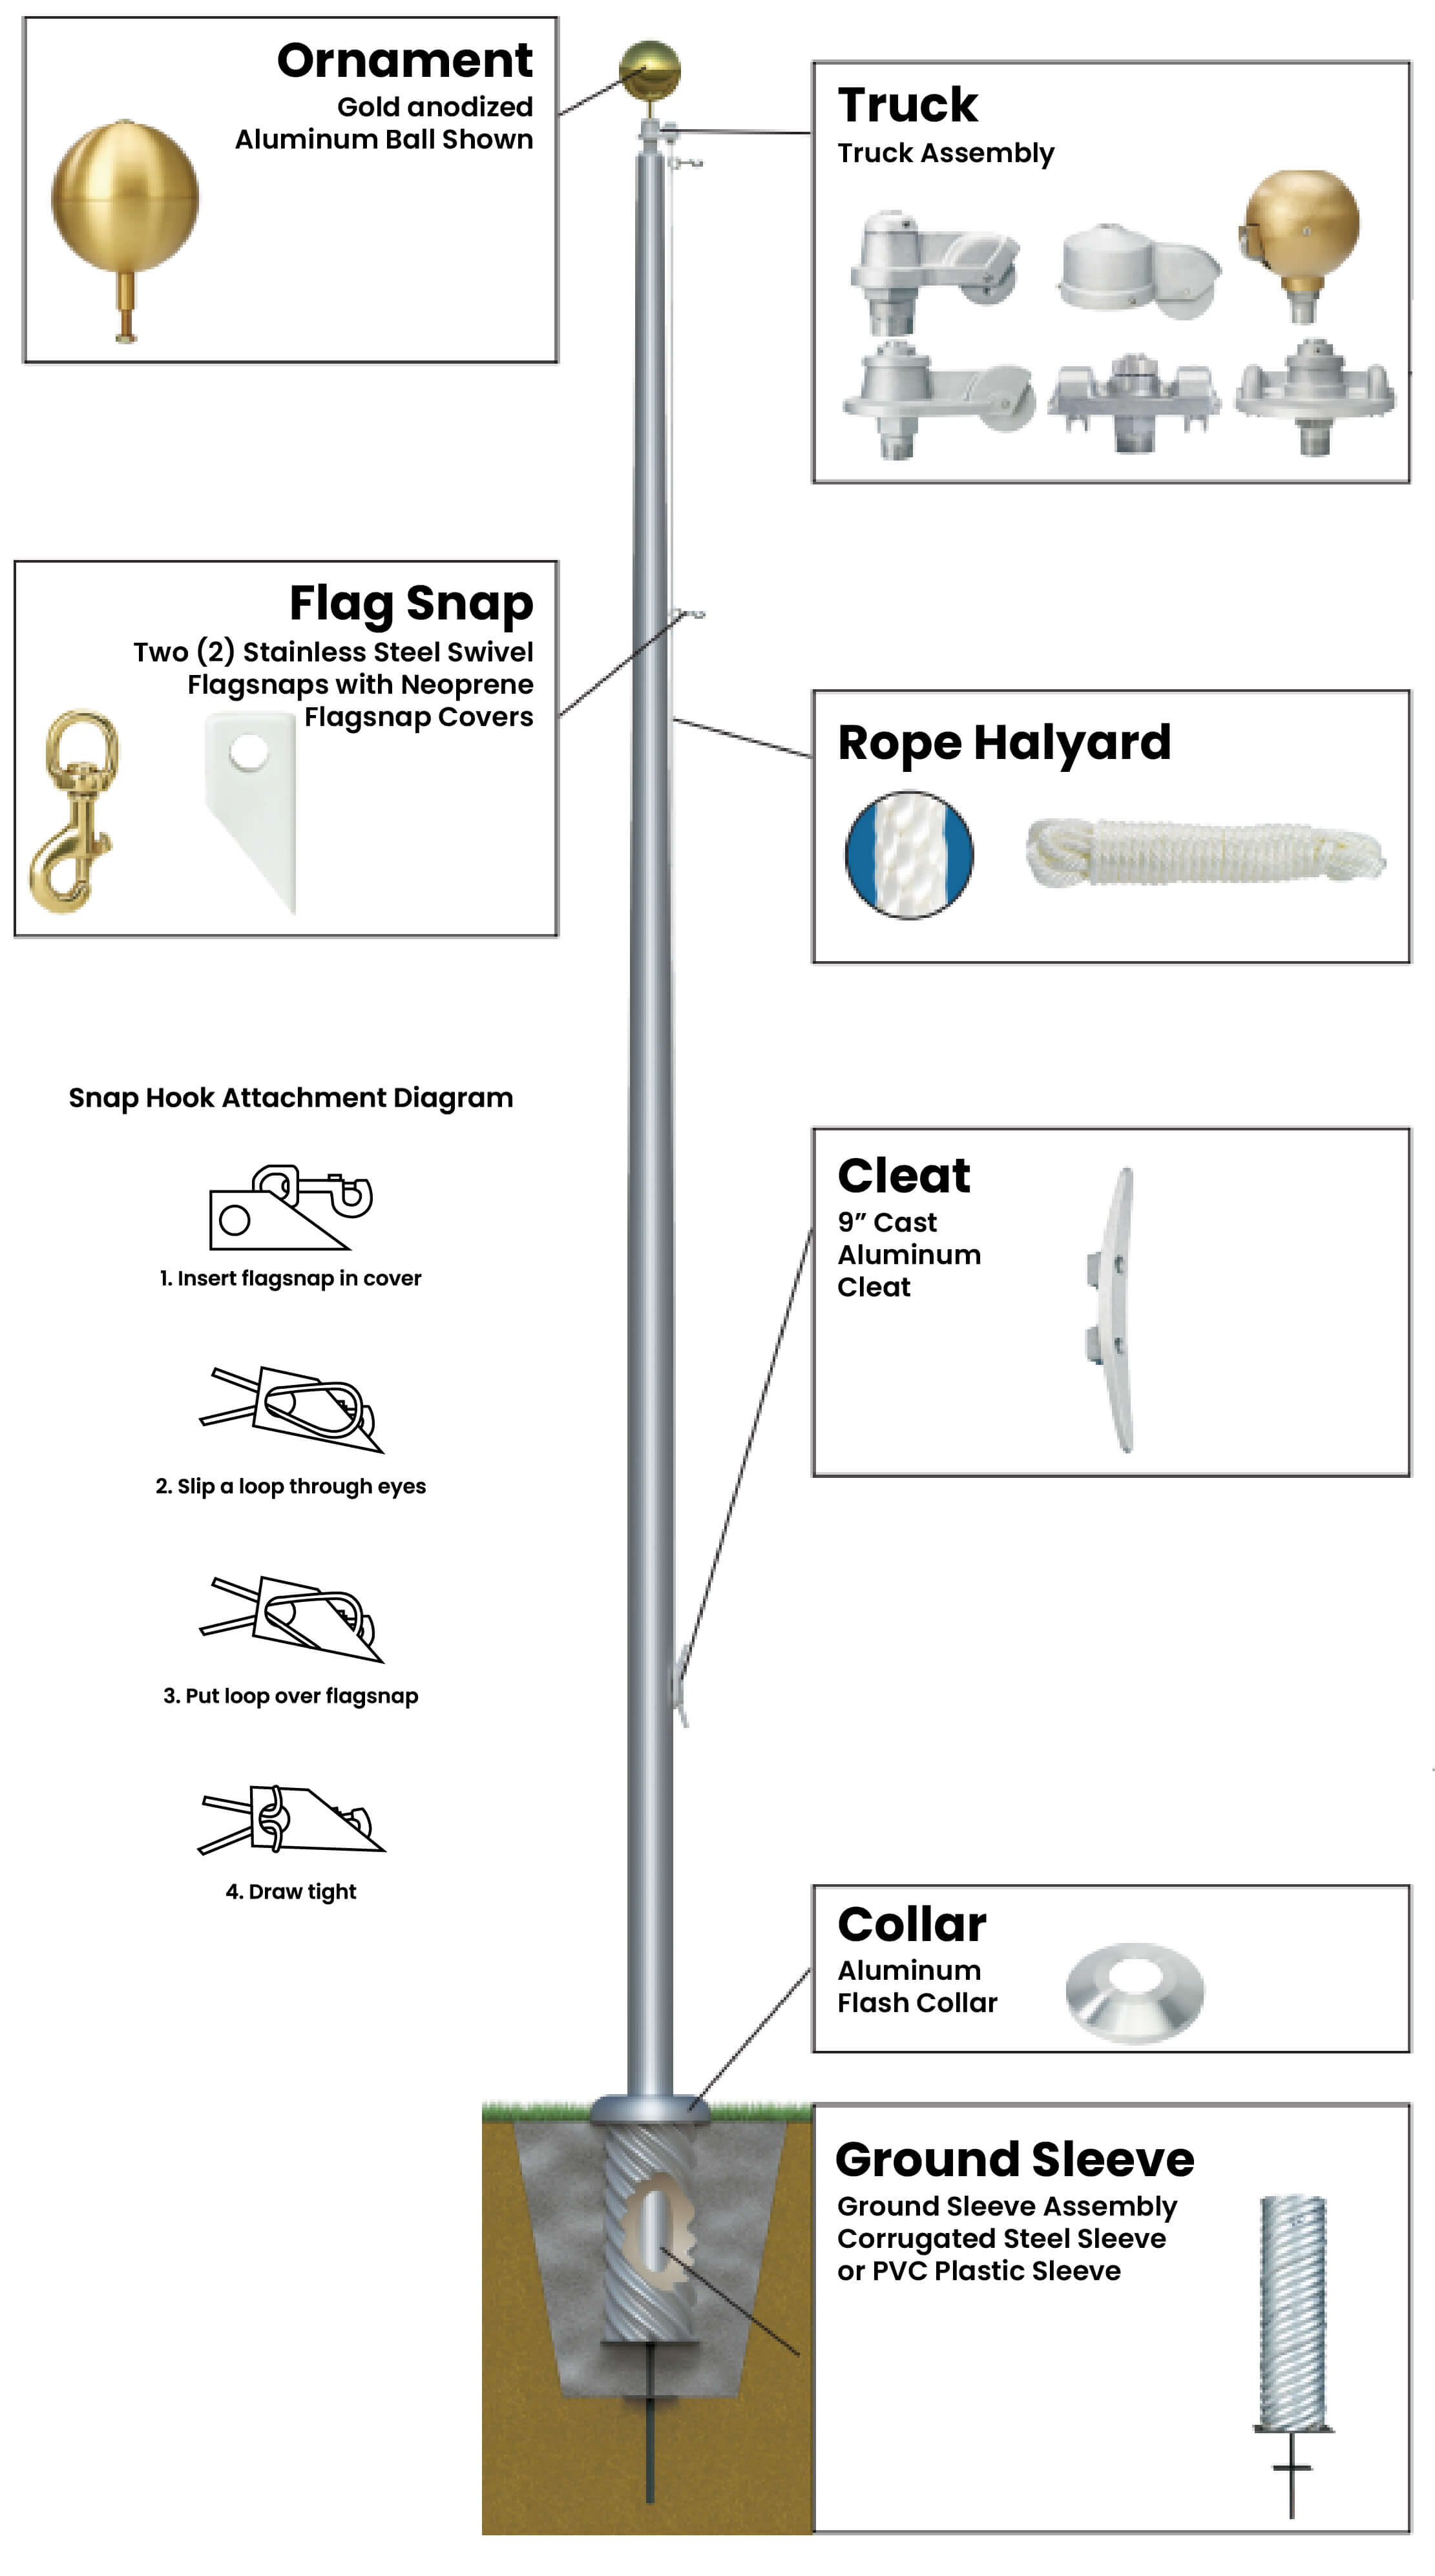
Foundation Installation
1. Choosing the Location:
- Visibility: Ensure the chosen location allows the flagpole to be seen clearly from desired vantage points, such as the road or building.
- Space: Verify that there is enough space for the flag to fly freely without hitting any obstructions.
2. Digging the Hole:
- Size and Depth: The dimensions of the hole depend on the height of the flagpole. Consult the flagpole foundation dimensions guide for specific recommendations.
- Hole Preparation: Use a shovel or post hole digger to create a hole that accommodates the ground sleeve and the concrete footing. Typically, the hole should be about 10% of the flagpole's height plus additional space for the concrete base.
3. Placing the Ground Sleeve:
- Positioning the Sleeve: Place the ground sleeve in the center of the hole. Ensure that the corrugated sleeve rod is pushed into the ground until the steel support plate is resting on the bottom of the hole.
- Elevation: The top of the ground sleeve should be approximately 1"-2" above the surrounding ground to allow for proper drainage.
- Vertical Alignment: Use a level to ensure the ground sleeve is vertically plumb. Adjust and brace the sleeve to keep it in place while the concrete is poured.
4. Pouring Concrete:
- Concrete Preparation: Prepare the concrete mix according to the manufacturer's instructions.
- Pouring the Concrete: Slowly pour the concrete into the hole around the ground sleeve. Be careful to pour at a rate that prevents the ground sleeve from floating or shifting. Continue to verify the vertical alignment as the concrete is added.
- Finishing: Use a trowel to smooth the surface of the concrete and achieve the desired finish. Ensure the concrete is level with the surrounding ground.
5. Protecting the Ground Sleeve:
- Covering the Sleeve: Keep the inside of the ground sleeve dry and free of debris by covering the opening with plastic or another protective material.
- Curing Time: Allow the concrete to cure for a minimum of 24 hours before proceeding with further installation steps. This ensures the concrete has reached sufficient strength to support the flagpole.
6. Final Checks:
- Inspection: After the concrete has cured, check the ground sleeve to ensure it remains plumb and free of debris.
- Preparation for Flagpole Installation: Once the concrete is fully cured, remove any protective coverings and prepare for the flagpole installation.
7. Additional Tips:
- Weather Conditions: Avoid pouring concrete in adverse weather conditions, such as heavy rain or extreme temperatures, which can affect curing and strength.
- Safety: Use appropriate safety gear, including gloves and safety glasses, during the installation process to protect yourself from concrete and other materials.
By following these steps, you will ensure a solid foundation for your flagpole, providing stability and durability for years to come.
Shaft Preparation
Proper preparation and assembly of the flagpole shaft are critical to ensure a stable and secure installation. Follow these detailed steps for preparing the flagpole shaft, whether it is a single piece or a multi-section unit:
1. Positioning and Inspection
- Position the Flagpole:
- Place the flagpole base as close as possible to the foundation where it will be installed. This helps streamline the assembly process and ensures a smooth transition from the base to the installed position.
- Inspect the Shaft:
- If you are working with a multi-section flagpole, inspect each shaft section carefully for any damage or defects before assembly. Check for dents, scratches, or any other signs of damage that could affect the flagpole's performance.
2. Single-Piece Flagpole
- If you have a single-piece flagpole, you can proceed directly to the hardware assembly steps. Ensure that the single-piece flagpole is carefully handled to avoid any damage during this process.
3. Multi-Section Flagpole Assembly
- Align and Fit Sections:
- Multi-section flagpoles come with self-aligning jam sleeves that are designed for a strong and permanent field assembly. Ensure that the sections are aligned correctly by matching up the alignment marks on each section.
- Gently slide the sections onto the jam sleeve as far as possible without forcing them. Align the match marks to ensure proper fit.
- Facilitate Assembly:
- To ease the assembly process, roll the flagpole 180° every 2 to 3 inches as you slide the sections together. This technique can help with alignment and prevent binding.
- Addressing Assembly Difficulty:
- If you experience difficulty fitting the sections together, particularly within the first 6 inches, try the following:
- Cooling Technique: Pull apart the sections and cool the male section with ice for several minutes. The cold can contract the metal slightly, making it easier to fit.
- Impact Technique: With the flagpole sections aligned, place a 4 x 4 block of wood against the top of the flagpole. Use the wood to absorb direct shock and gently strike the wood with a hammer to drive the sections together. Avoid using excessive force, as this can damage the flagpole.
- If you experience difficulty fitting the sections together, particularly within the first 6 inches, try the following:
- Install Additional Sections:
- If the flagpole is a 3-piece unit, clean, lubricate, and install the next section using the same technique described above. Ensure that each section is aligned and fitted correctly before proceeding.
4. Surface Care
- Keep Surfaces Clean:
- During assembly, ensure that the finished surfaces of the flagpole shaft remain free from handprints, excess lubricants, or other contaminants. Use clean, dry cloths to handle the flagpole and avoid direct contact with the finished surface.
5. Final Check
- Verify Alignment:
- After all sections are assembled, check the entire flagpole for proper alignment and secure fit. Ensure that all joints are snug and that there are no gaps or misalignments.
By following these steps, you will prepare the flagpole shaft for a smooth installation. Proper assembly and handling will help ensure that the flagpole performs reliably and enhances the appearance of your property or business. If you encounter any issues or need further assistance, feel free to reach out for support.
Hardware Assembly
Proper assembly of the flagpole hardware ensures smooth operation and longevity. Follow these steps for installing the truck, ornament, cleat, halyard, and collar:
1. Anti-Seize Compound
- Application: When working with threaded aluminum components, apply a light coat of anti-seize compound to prevent threads from seizing and to ease future disassembly. This compound is available at most hardware stores.
2. Installing the Truck
- For Stationary Trucks:
- Position the Truck: Slide the stationary truck over the top of the flagpole shaft. Rotate the truck to align the pulley in the desired direction. Common practice is to align the pulley directly over the cleat, but aligning with the prevailing wind direction may also be preferred.
- Secure the Truck: Once the truck is in the desired position, secure it by tightening the set screws using an Allen head wrench.
- For Revolving Trucks:
- Check Threads: Inspect the rotating truck assembly and flagpole top insert threads for any burrs or irregularities. Ensure that the threads are clean and undamaged.
- Install the Spindle: Thread the rotating truck assembly spindle into the top of the flagpole. These threads are 1 ¼" NPT (National Pipe Thread), so be cautious to avoid cross-threading, which can damage the aluminum threads. Snug the spindle using an appropriately sized wrench. Approximately half of the spindle threads should be engaged before it is fully seated. Do not use epoxy on the spindle threads.
3. Attaching the Ornament
- Prepare the Ornament: Unpack the flagpole ball and thread the jam nut up the ornament shaft. Apply a small amount of epoxy (e.g., Loctite) to secure the jam nut in place. For added stability, you might add a lock washer (1/2" or 5/8" depending on spindle shaft size).
- Thread the Ornament: Carefully thread the ball into the top of the truck. Use vise grips to hold the spindle/rod while tightening the ornament. Avoid gripping the ornament itself to prevent damage. The ornament shaft should protrude approximately 1/4" inside the truck cover.
- Secure the Ornament: After positioning the ball, use a properly sized wrench to tighten the jam nut against the top of the truck assembly. If the truck has a set screw, use an Allen wrench to tighten the screw into the ball stem.
4. Installing the Cleat
- Position the Cleat: Install the cleat(s) into the 1/4"-20 NC tapped holes on the flagpole. These bolt holes are typically located about 4'-1/2" above ground level.
- Secure the Cleat: Slide the provided stainless steel screws through the cleat and start them into the pre-drilled holes. Tighten the screws snugly using a hex wrench, taking care not to cross-thread or over-tighten. Work both screws evenly to ensure a secure fit.
5. Feeding and Securing the Halyard
- Feed the Halyard: Feed the rope halyard around the truck pulley and down toward the bottom of the flagpole. Cut the halyard to the desired length, allowing extra slack for wrapping around the cleat.
- Secure the Halyard: Fuse the end of the halyard with a hot blade or flame to prevent fraying. Tie the two ends of the halyard together with a square knot or a fisherman knot to form a complete loop. Tape down the loose ends with white electrical tape to keep them from interfering with the cleat.
- Install Flagsnaps: Attach flagsnaps and neoprene covers on either side of the knot to accommodate the flag size and prevent the knot from interfering with the cleat.
6. Attaching the Collar
- Position the Collar: Before raising the flagpole, gently slide the flash collar up toward the cleat or access door. Tape it out of the way near the cleat, taking care not to drop the flagpole or damage the collar.
- Protect the Finish: Use protective wrapping around the flagpole shaft to prevent damage to the finish during the installation process.
Final Checks
- Ensure all components are securely attached and aligned correctly.
- Verify that the halyard operates smoothly and the cleat holds the halyard in place without slipping.
- Confirm that the flagpole stands vertically and all hardware is properly installed.
By following these detailed steps, you will ensure that your flagpole is correctly assembled and ready for installation. If you encounter any issues or have questions during the assembly process, feel free to seek assistance.
Standing the Flagpole
Properly standing the flagpole is crucial for ensuring stability and correct positioning. Follow these steps to safely and effectively place and secure the flagpole into the ground sleeve.
1. Align the Flagpole
- Directional Considerations: Before placing the flagpole in the ground sleeve, align the shaft so that the stationary truck or non-revolving truck faces downwind or in the direction opposite the prevailing winds. This alignment helps the flag fly in the same direction as the wind, enhancing flag durability and performance.
- Revolving Trucks: If using a revolving truck assembly, the direction of the shaft is less critical, as the truck will rotate with the wind.
2. Position the Flagpole
- Aligning Access Door or Cleat: For stationary trucks, rotate the access door or cleat to the desired side of the flagpole for convenient user access and operation. This may require repositioning the stationary truck considering wind-related stress.
- Positioning the Butt: Ensure that the butt end of the flagpole is near the ground sleeve foundation.
3. Lifting the Flagpole
- Small Flagpoles (15' – 25'): For flagpoles up to 25 feet, carefully lift the pole and align it with the ground sleeve. Use the butt end of the shaft to hold it down securely in the ground sleeve. As you lift, ensure the flagpole does not pop out or become unsteady.
- Method: Tilt the flagpole into the ground sleeve, using the corrugated sleeve to guide and secure the pole as it descends. It is helpful to have one or two assistants to help maneuver the pole into position.
- Large Flagpoles: For flagpoles over 25 feet, use a crane or bucket truck for the lift. Ensure that professionals with experience in rigging and lifting perform this task. Keep a safe distance from the lifting area.
4. Handling Multi-Section Flagpoles
- Joint Alignment: If your flagpole is multi-section, ensure that all joints are fully seated and the shaft is straight before lifting.
- Rigging Arrangement: Arrange rigging so that the flagpole sections are supported from the bottom to ensure that joints are pushed together rather than pulled apart during the lift.
5. Securing the Flagpole
- Spacing and Plumb: Once the flagpole is inserted into the ground sleeve, there will be some spacing between the shaft and the sleeve. Use wooden wedges to plumb the flagpole.
- Centering: Use teepee guides at the bottom of the ground sleeve to center the flagpole.
6. Filling and Securing the Ground Sleeve
- Sand Filling: Gradually fill the void between the flagpole and the ground sleeve with washed, screened, dry tamped sand. Fill in layers of 6" to 8" at a time, tamping each layer as you go to ensure stability.
- Leveling: Continuously check and adjust the flagpole to keep it level while filling.
- Capping: Once the ground sleeve is filled to about 1-1/2" – 2" from the top, cap it with a waterproof compound.
7. Finishing Touches
- Flash Collar: After the waterproof compound has dried, slide the flash collar down into position. Caulk the joint between the flagpole and flash collar with a matching color silicone to seal the space and provide a clean finish.
By following these steps, you will ensure that your flagpole is correctly installed and secured, ready for flag display and use. If you encounter any difficulties or have questions during the installation process, don't hesitate to seek professional assistance or guidance.